In a previous article, we talked about elevated iPad kneeboards and the benefits of using one. Some of the key features of the elevated kneeboard should include not covering the iPad screen (too much), being able to tilt the screen for improved viewing, and leaving some 'airspace' at the back of the iPad to facilitate 'cooling' (particularly if you use our cooling case).
In that article, we also mentioned a kneeboard solution by OHLPRO that looked like it would work with our cooling case. But at that point, we hadn't tested it and couldn't say (for sure that) it would work. The next logical thing to do was to get one and try it out. Here, we are going to share more about how the OHLRO pilot kneeboard works.
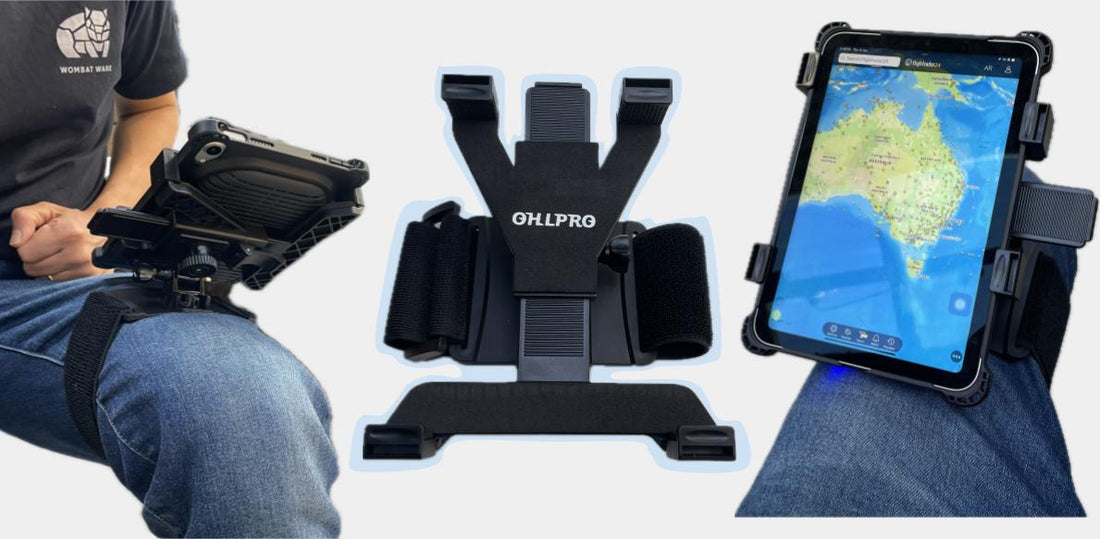
What's in the box.

The OHLPRO pilot kneeboard consists of three main components:
1. iPad mount
The adjustable iPad mount/holder consists of these 2 by 2 Prongs that can be extended outwards to fit iPads from 7"-11" (according to the user doc). Basically your iPad Mini to iPad Pro 11". A clip at the back lets the user lock the extendable arms once the iPad is put in place.
The areas that contact the iPad are padded with rubber or foam-like material to prevent scratches.
Mounting points at the back connects the mount to the Mount attachment which clips to the Kneeboard strap.

2. Kneeboard strap
The kneeboard strap can be strapped to the user's leg with the loop and velcro. It has a board with a clip interface, which is where the Mount attachment clips on.

3. Mount attachment
The Mount attachment has 2 adjustable knobs - one for tilting/adjusting the mount angle up or down, and the other for rotating the mount (hence rotating the iPad). It has a clip that clips into the Kneeboard strap, and four mount connectors at the top that connects to the mounting points at the back of the iPad mount.

Set Up / Assembly

To set up the kneeboard, we must first clip on the Mount attachment to the kneeboard. Then, connect the iPad mount to the Mount attachment via the mounting points. Make sure all four connectors on the Mount attachment match the mounting points, insert them, and push them upwards (as indicated in the photo below) to lock them in.

Using it with an iPad mini (in a cooling case)

Once the kneeboard is assembled, we can wear it on our leg (whichever leg we want the iPad to be on). We could then place our iPad mini (with the cooling case) in the iPad mount by extending the mount arms, putting the iPad mini on, and retracting the arms to clamp the iPad mini securely. Lastly, ensure the clip at the back is locked so the arms clamp the iPad mini securely.

Three things to note
1) Extendable ends (thick iPad case)
Our cooling case is on the thick side (compared to regular iPad cases). Still, fortunately, the OHLPRO kneeboard has extendable ends, which allow iPads with thicker cases (like our cooling case) to fit in quite comfortably.

2) Access to buttons (mount orientation)
When we placed the iPad mini into the Mount with the arms clamping the length (longer side) of the iPad mini, the arms blocked the buttons (Touch ID and volume buttons). So it would be better to place the iPad mini into the Mount with the arms clamped on the width (shorter side) of the iPad mini. That way, the buttons are accessible, and the iPad mount can still be rotated by 90° so that the iPad can be viewed in portrait mode.

3) Using it with the iPad mini cooling case (with Pencil holder)
If we want to use the OHLPRO kneeboard mount with the iPad Mini Cooling Case (with Pencil holder), we need to take note of the position of the iPad on the mount so that access to the Pencil is not blocked by the clamp arms. Ensuring the ends are extended upwards also allows the Pencil to be accessed more easily.

Pros and Cons
Finally, we want to leave you with some pros and cons of the OHLPRO kneeboard, and this is mainly from the perspective of using it with our Cooling Case.
Pros.
1) The padded surfaces on the mount means the iPad or the case will not get scratched easily.
2) It does fit our Cooling Case well because it has those extendable ends which works for iPads with thick cases.
3) Multiple views - it supports a tilted view or landscape or portrait view, simply by adjusting the knobs.
4) When used with the Cooling Case, the vents at the back are not blocked. This means the airflow is not restricted and cooling should work effectively.
Cons. (a few complaints)
1) The adjustments can get a bit noisy. Either extending the clamp arms or tilting the mount will result in (somewhat) loud screechy/scratchy sounds.
2) The rotation knob can fall off if we loosen it too much and it can be tricky to try and put it back.
That is it. I will leave you with a video below of what has been covered in this post. If you have any questions, feedback or comments, please leave us a note in the comment section below or leave us a message here.
Interested in the product?
We have just joined OHLPRO as an affiliate, and you can order it here - affiliate link - and use WOMBATWARE at checkout for a 10% discount.